Editing your photographs can be a laboriously long task – Sometimes that perfect shot needs a little bit of editing to really make it stand out. Well, we wanted to get some expert advice on what to do and what not to do when it comes to editing your favourite photos. Who better to talk to than one of our resident professionals Lucinda Grange.
1 - DON’T GIVE YOURSELF EXTRA WORK!
There is no denying that Photoshop is an amazing tool that we all rely on. However, it can sometimes be an excuse for sloppy photography. If you can shoot perfectly (which most of the time you can) then do it! If someone is in the background, just politely ask if they wouldn’t mind moving - It’s far easier than later editing them out.
2 - DON’T PANIC!
Photoshop can look quite intimidating but you needn’t worry. Just take a deep breath, stay calm and I assure you that you’ll be a Photoshop pro within no time at all.
3- RAW
Before even getting into Photoshop, shoot Raw if you can! You should also make the most of Camera Raw. Not only is Camera Raw an amazing bit of software, but it’s simple to use too – once you start using it you’ll never go back.
4 - USE ‘ALT’!
When you’re using Camera Raw, try pressing ‘ALT’ on the basic menu as you slide the ‘Blacks’ or ‘Whites’ slider. This will mask everything but the blacks/ whites within your image, helping you to judge if you’ve pushed your highlights or shadows too far. Take a look!
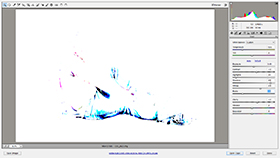
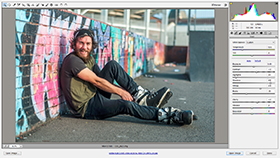
WITH ‘Alt’ WITHOUT ‘Alt’
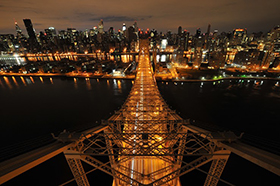
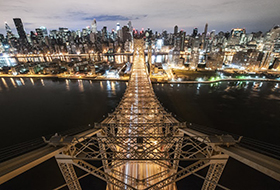
5 - PERSPECTIVE!
If you love to shoot architecture, try out ‘Perspective’ in the ‘Transform’ menu. Correct the image and pull all of the lines parallel to one another. This will give a great feel to your photo.
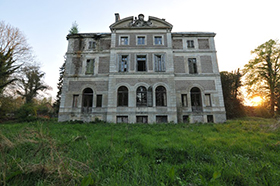
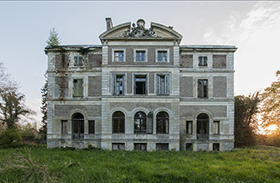
BEFORE AFTER
6 - WHITE BALANCE!
All light sources have a colour to them - you’ve probably noticed this when taking photographs under street lights as they turn orange. Don’t worry, your whites can become white again. I find it best o do this through Camera Raw in the ‘Basic’ menu – it’s quick, easy and gives a stunning finish.
BEFORE AFTER
7- ZOOM!
If you’re working on details within your image, don’t forget to zoom in and get a closer look at what you’re doing, whilst also occasionally zooming back out to make sure you’re not getting lost in too much of a small part of the image. Shortcuts for doing this are clicking ‘Ctrl’ whilst also clicking ‘+’ to zoom in, and ‘-’ to zoom out. You’ll also find taking time to learn all the shortcuts will help you save time while editing.
8 - ‘Ctrl’, ‘Alt’ & ‘Z’
This is the shortcut that I probably use the most. By clicking ‘Ctrl’, ‘Alt’ & ‘Z’ at the same time your last change in Photoshop will be undone.
9- KNOW WHEN TO STOP!
Unless you want a fine-art based approach, there is such a thing as over editing. Keep edits minimal and people won’t automatically stop and think ‘this has been changed’.
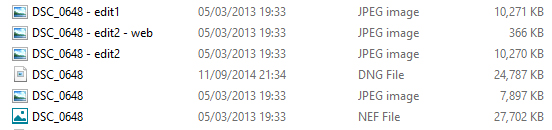
10 - SAVING!
Quick, silly names such as ‘portfolio 1′ may seem like a good idea at the time. However, there is nothing worse than wasting hours of your time hunting down images long after Photoshop has been closed– so make sure you have a set way of saving and organising your photos. I find it best to have all my images ordered by name and instead of re-naming, I add to the name of the image. Also, always make sure you save an edited image full size before you make it web sized. Otherwise you’ll have to edit it all over again in order to print it.
So, good luck and get editing! If you’ve got any other handy tips share them in the comments below.
You must be logged in to comment