In the past, creating panoramic photos used to involve either buying an expensive camera or spending hours in the  darkroom, attempting to stitch together images by overlapping exposures onto the finished photo paper. But now, in the digital age, there have been developments in software that make it a lot easier to put these photos together, meaning a rise in popularity for panoramic photography.
Panoramic shots are great for capturing sweeping landscapes and give the viewer a much larger sight of the subject. The panoramic shot is almost an experience and, as such, images have seen a rise in sales. This is a skill that professionals definitely need to perfect.
With this in mind, here we share with you 3 tips to take into account when taking your panoramic photos:
1. Be careful with wide angle lenses
Wide angles lenses tend to create too much distortion in the photograph where you would likely need to crop the corners of each frame resulting in a smaller, lower resolution image. It is better to allow the stitching software to put the multiple photos together rather than attempt to fit the whole image into one frame. Unless you are shooting night photography where you need to capture the starlight, we recommend that you do not use a super wide angle lens. It is better to take multiple photos at the scene and stick to a smaller angle of 50mm or less in order to develop your masterpiece.
2. Keep the camera at a level angle
When capturing a photo of a building and its surroundings, it is very important to keep the camera at a flat, level angle in order to develop a straight, professional looking image.
Keeping your camera on a level surface, especially if you are trying to take a 40 image shot, is essential because this will allow the photo to accurately grasp the main image and the surrounding scenes. When held at a level angle, all parts of the scene in front of the camera comes in and hits the sensor at roughly the same angle, developing a straight photo. If the camera is pointed down, the photographer brings in distant objects at a much sharper angle than the foreground objects, meaning your image will not be straight and will create a fan effect photo - which is not something you want!
Take a look at this image taken by Nishant Bhaskar. The photograph captures all the beauty of Humayun’s tomb as he has kept his camera equal displaying the sky as well as the nature all around.
3. Overlap Amply
Overlapping is a vital aspect when taking a panoramic photo; it is the amount of each frame that will blend together in post-production. If you make one mistake with not enough overlap, it can ruin an attempt at the grandest of wide angle shot. If done incorrectly, the photo will be produced with a bar of white down the middle because of the failure to overlap properly. As you move from one exposure to the next, pick a stationary object, like a tree, in each frame so that it is easier to know where to put together the final image. Overlapping by 25% to 50% is needed to create the correct effect for your photograph – increasing the overlap helps to reduce the flares that occur and the distortion of the corners.
Haryadi Be perfectly uses the skill of overlapping here to create a stunning image of Turi Beach incorporating many elements within the scene in order to capture a full view of the beach. The blue sky and milky white clouds enhance the image and make this a stunning shot.
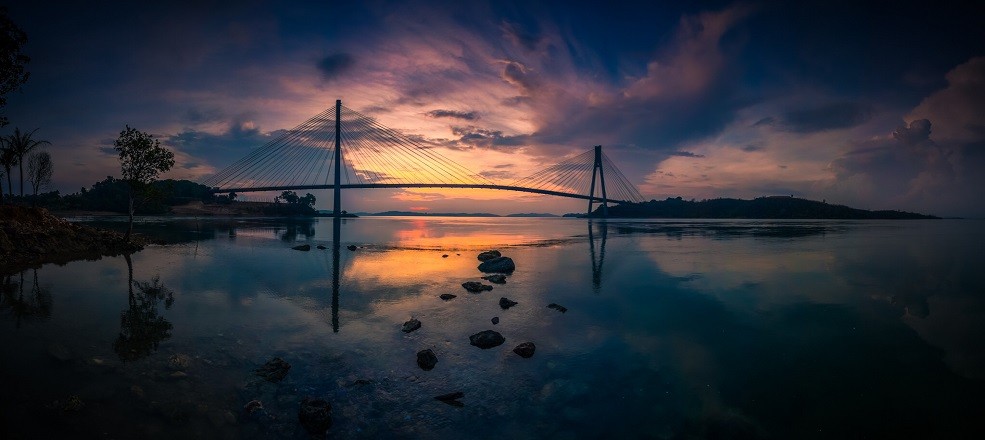
Again, in this photo Haryadi manages to capture the length of a full bridge stretching between islands as the sun goes down. Take note of the marvellous reflections of the clouds above also captured in the water in the shot. Haryadi’s panoramic photography is to be commended and sets and example of just what can be achieved when photographers get it right.

We would love to see your panoramic photography so be sure to upload them to CoinaPhoto. What’s the best advice you’ve received for shooting panoramic? Let us know with a comment and follow us on Twitter, Facebook and Instagram.
You must be logged in to comment